
If your Windows computer is having trouble connecting to Wi-Fi, constantly losing internet connection, or there are any network issues, resetting your network settings can help. Windows comes with a built-in network reset feature that will delete all network adapters and settings on your computer. After a reset, Windows will automatically install the network adapters and restore default network settings.
Resetting your network can resolve many of the most common problems with connectivity. However, this process will also clear out saved wireless networks and some other custom network settings. Therefore, it is best to use the network reset option after completing more basic troubleshooting options like restart your router, reconnecting to wireless network, etc.
This article will provide instructions on how to reset network settings on Windows 10 and Windows 11. It also explains the impacts of the reset and what to do if internet connectivity still isn’t working.
When Should You Reset Network Settings?
Using the reset network settings option is helpful when troubleshooting has not solved your problem. Here are some examples of when you should use it:
- Wi-Fi connections do not work even though you entered the correct password.
- Your computer has trouble getting online.
- You see a network message in Windows.
- The Ethernet connection is slow or not working.
- The network device drivers are malfunctioning.
- You did not remember your network configurations after changing them.
- You cannot get online after doing a Windows update.
- VPN connections and other information from a network have caused connectivity issues.
Remember that you do not always have to use the Reset Network Settings option at the first opportunity. If you cannot connect to only one specific website, the issue may not lie with your Windows setup. Furthermore, if you cannot get online with any device, then you may have an issue with your router or Internet Service Provider.
What Happens When You Reset the Network?
If you reset the network on your Windows computer, Windows will delete and reinstall the network adapters. In addition, many network options will revert back to their default settings on your computer.
Therefore, you will have to set up your network connection all over again.
A network reset can remove:
- Wi-Fi passwords that were saved.
- Custom hardware settings.
- Certain Virtual Private Network settings.
- Different kinds of virtual network adapters.
- Other options related to your network.
Thus, if you decide on resetting your network, make sure that you remember your Wi-Fi password, as well as other important information related to your VPN or other hardware setups.
How to Reset Network Settings on Windows 11
Windows 11 provides an easy network reset option from its Settings menu. Here are the steps you need to follow to reset your network settings.
1. Open Windows Settings
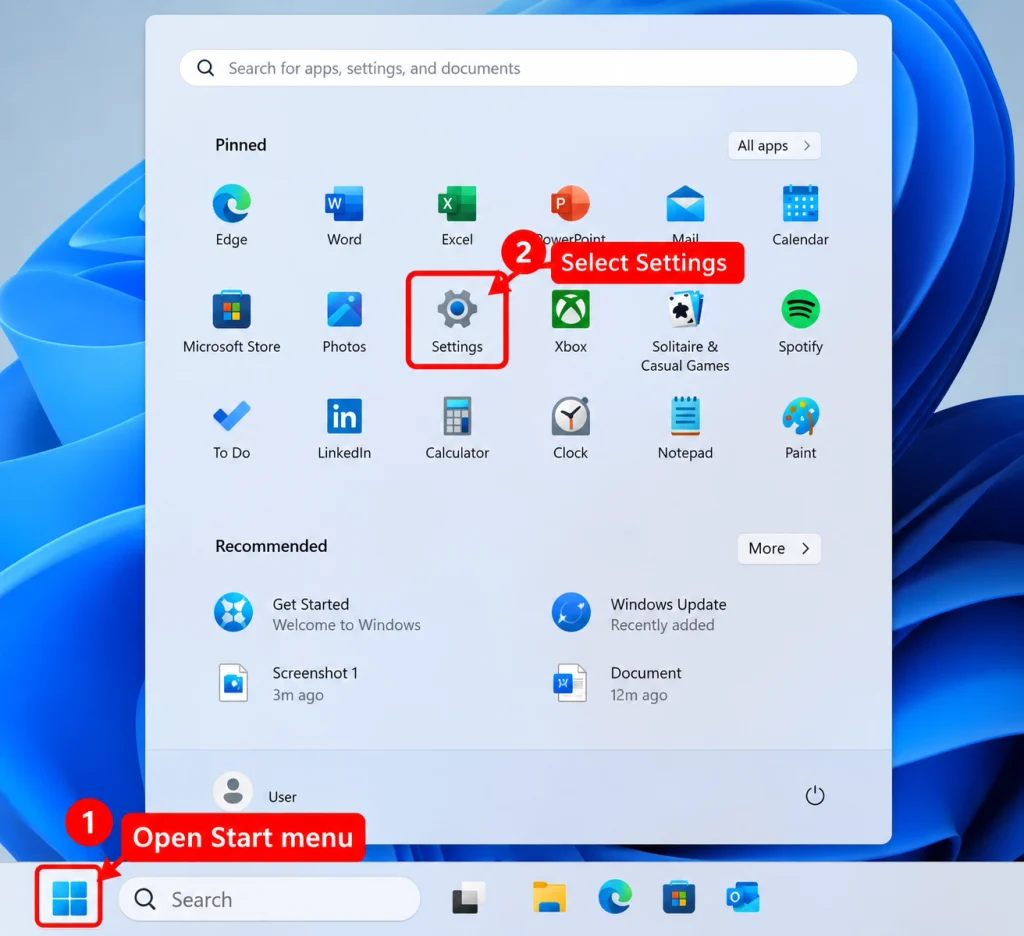
To access the Windows Settings, first, you have to open the Start menu. In Windows Settings menu, you can also press the Windows + I key on the keyboard.
2. Open Network & Internet
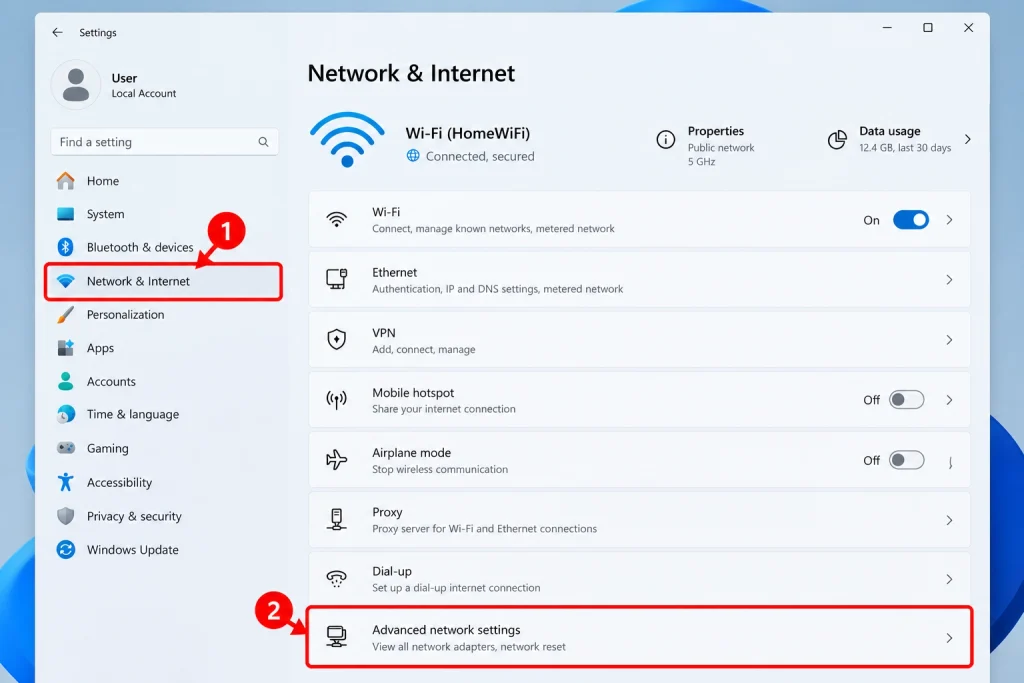
Inside the Windows Settings menu, you need to select Network & Internet. You will see all kinds of options pertaining to Wi-Fi, Ethernet, VPN, mobile networks, and other types of connection in this menu. After that, scroll down to select Advanced network settings.
3. Find Network Reset
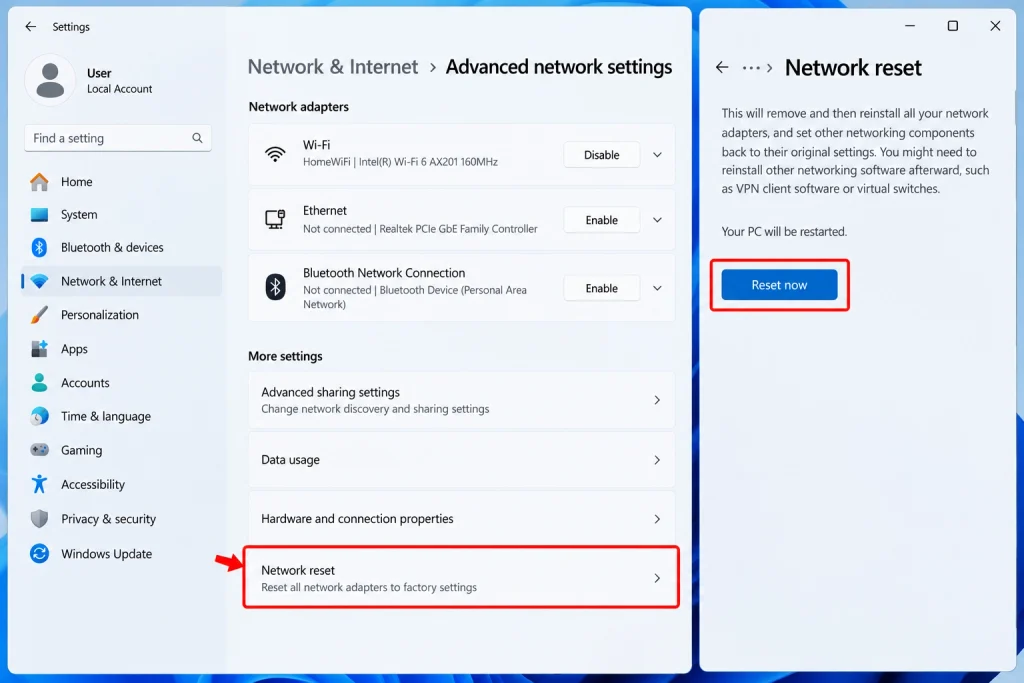
Once you click on it, the network reset interface will be display.
It is important to read the information about the reset from Windows before you proceed.
4. Click on Reset Now
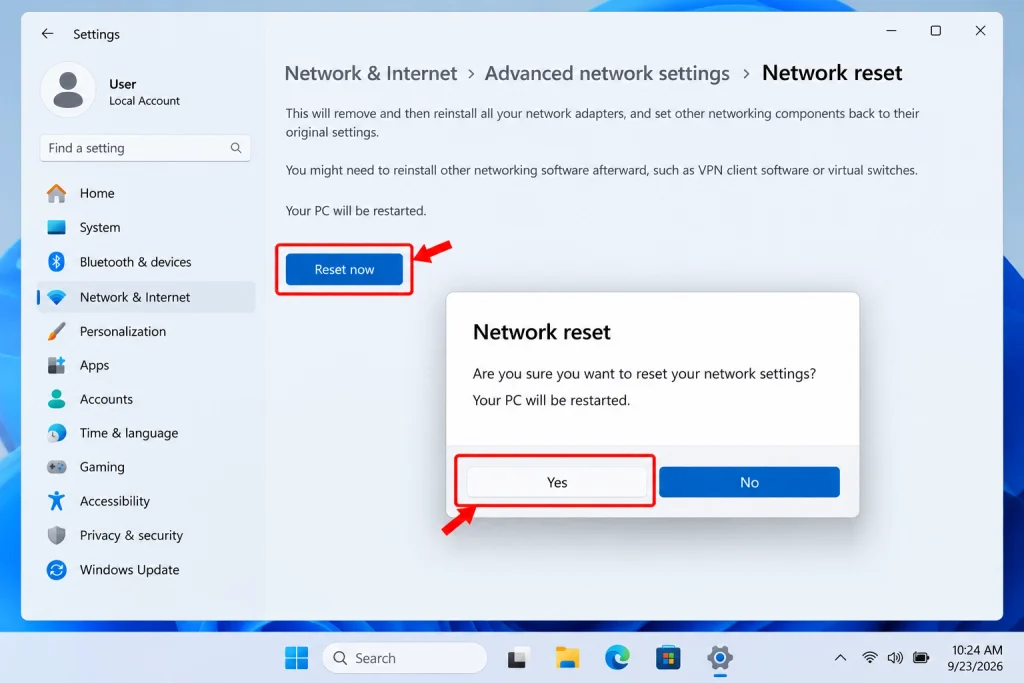
Select the option to Reset now to initiate the process.
If Windows requests you to confirm, either answer Yes or click to confirm.
5. Reconnect to Your Connection
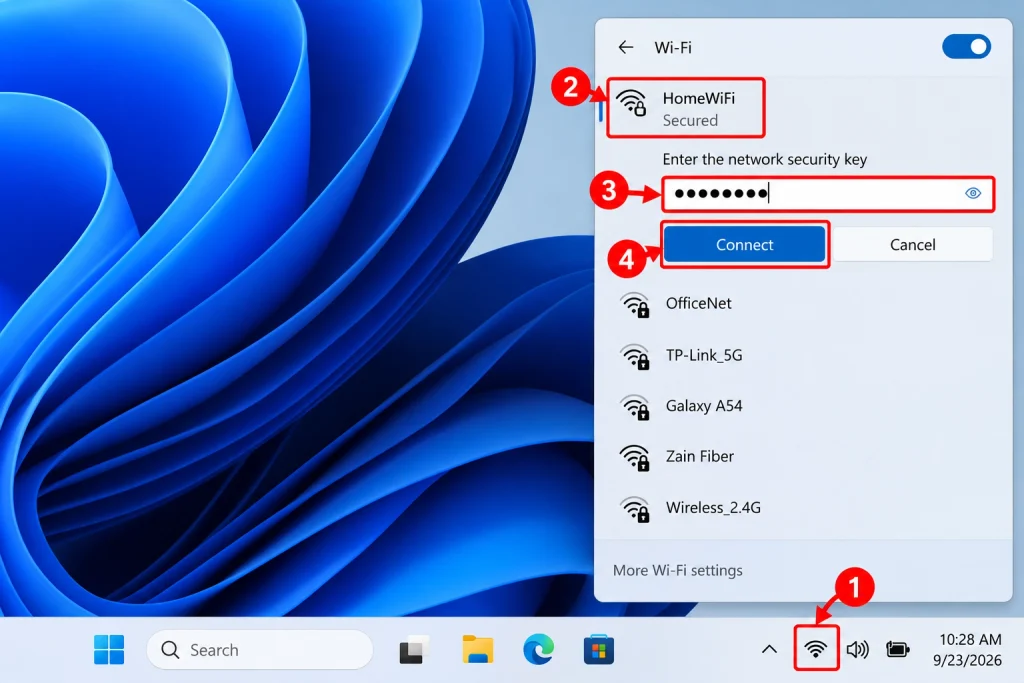
Once Windows has booted back up, your network settings should have been erased.
Click on the Wi-Fi icon on the taskbar. Search for your Wi-Fi network and type your Wi-Fi password.
Using an Ethernet should automatically provide you with a connection.
Now you should check your internet connection to see if you are working.
How to Reset Network Settings on Windows 10
The procedure is almost the same on Windows 10 but finding the option will not be complicated either.
Step 1. Open Settings
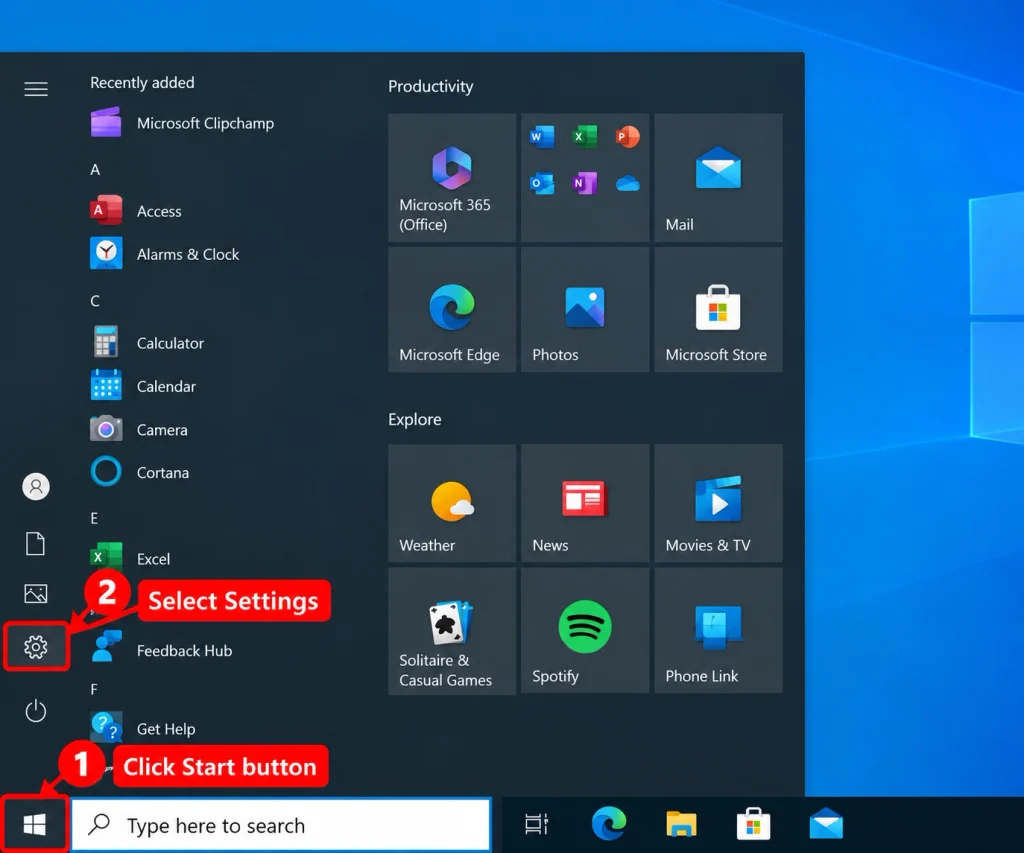
Hit the Start button.
Choose Settings from the menu which opens.
(To open Settings, you may hit Windows + I on the keyboard).
Step 2. Choose Network & Internet
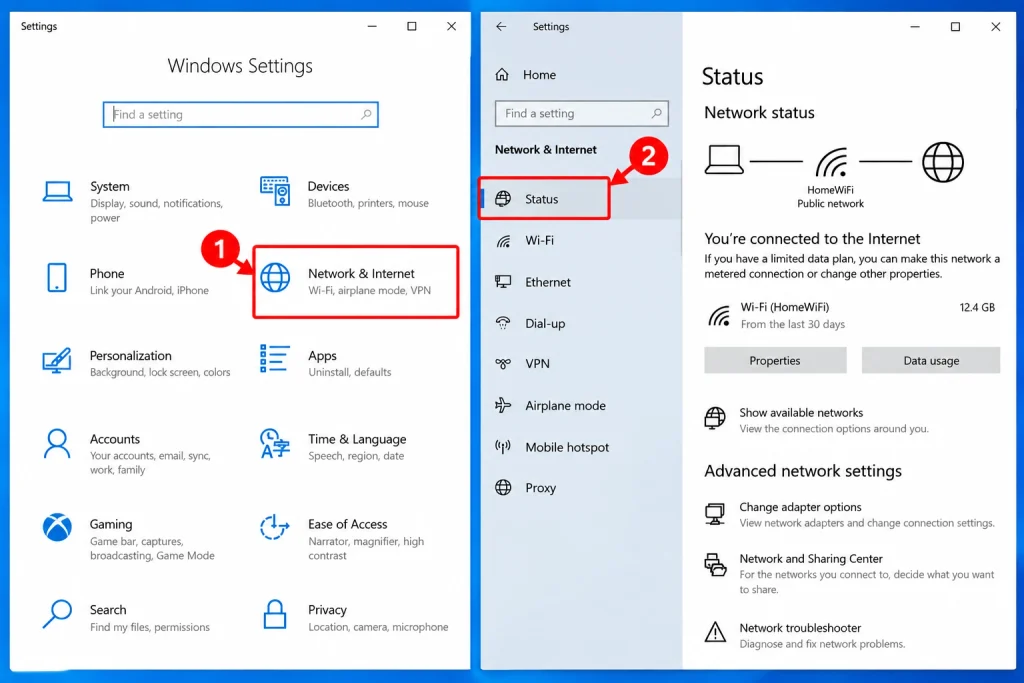
Click Network & Internet.
This page contains all the details about your existing connection.
Afterward, select Status from the left-hand side menu.
Step 3. Open Network Reset
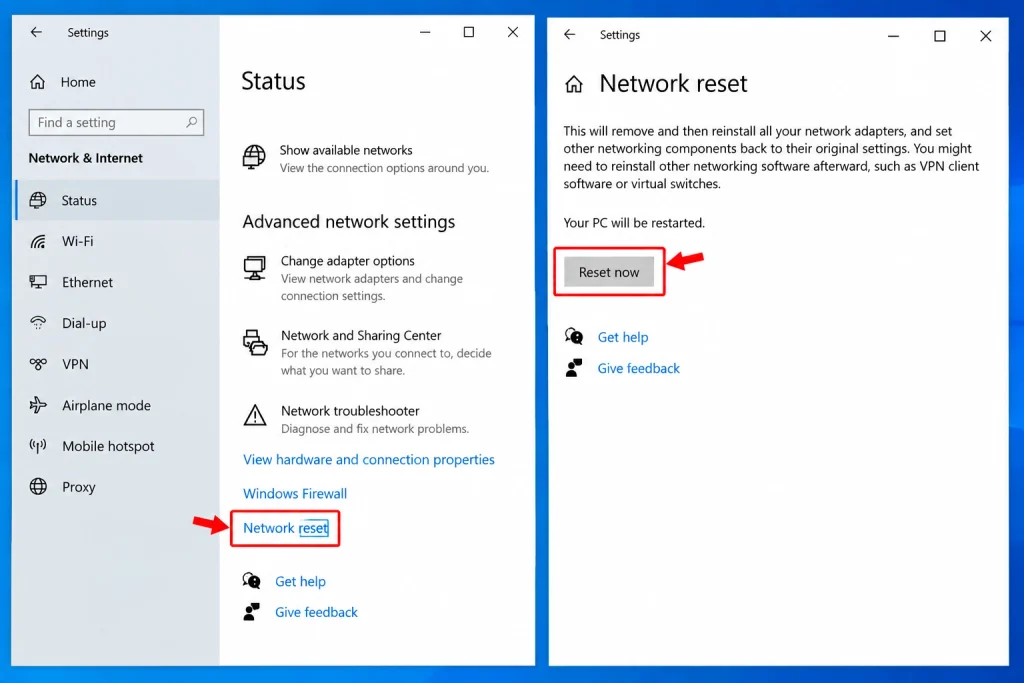
Scroll down the Status Screen until the Network Reset option is reached.
Click the option to proceed further.
Windows will show relevant information about the reset process. You will also learn that your machine will be restarting.
Step 4. Click the Reset Now
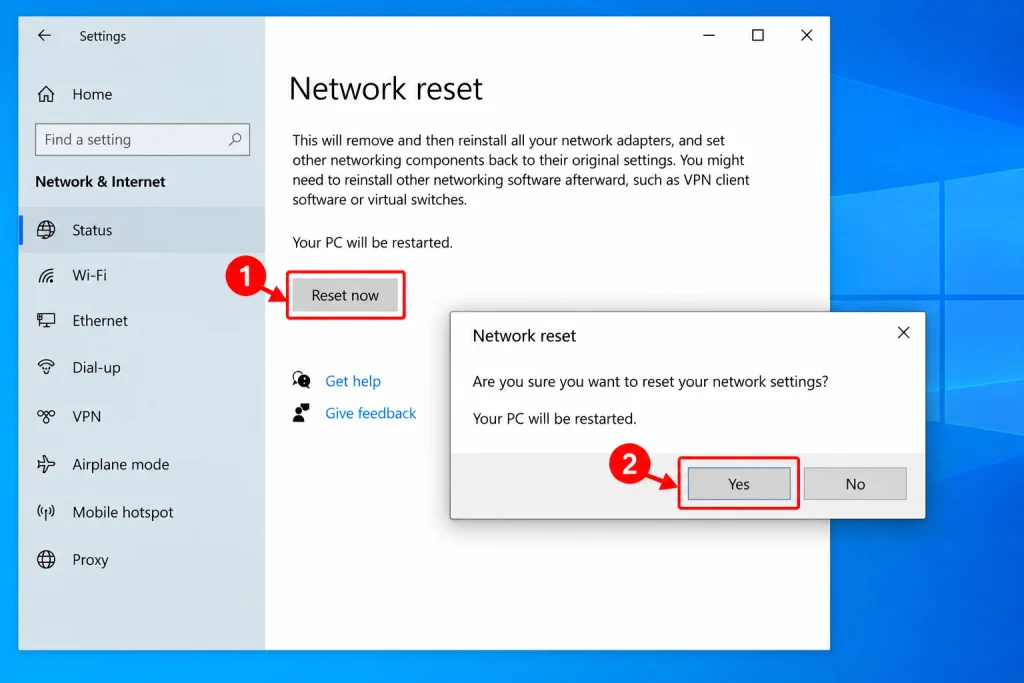
Select Reset Now.
You will need to confirm the action whenever asked by the Windows operating system.
Your PC will restart, then Windows will go ahead and remove the adapters and settings associated with them.
Step 5. Connect back to the Internet
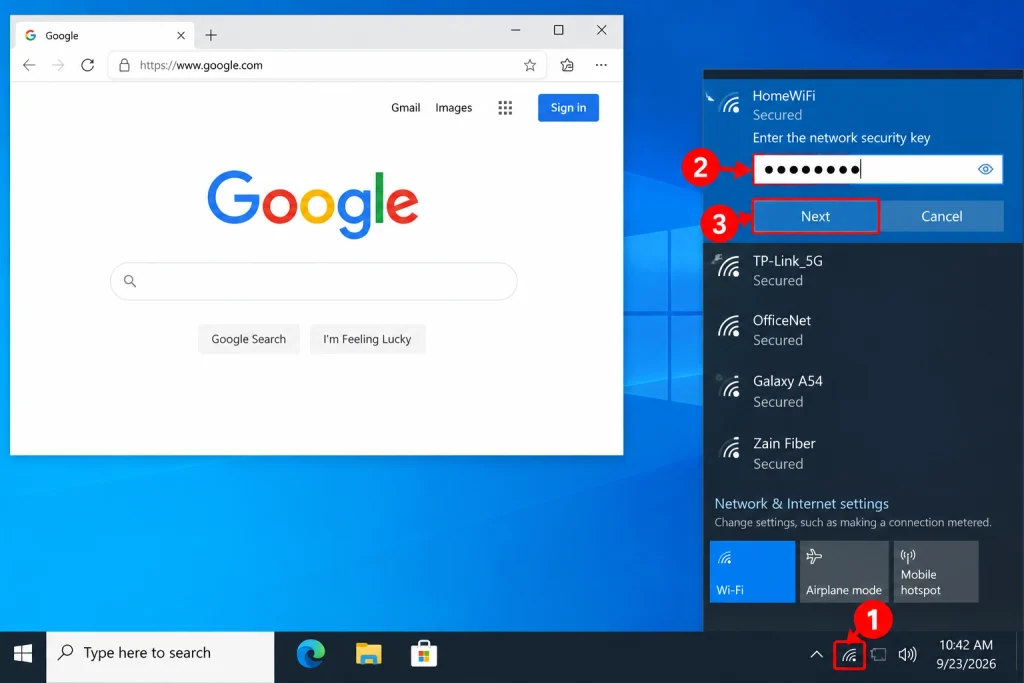
Once your machine has restarted, connect back to the Wi-Fi network.
Type in the required password if Windows prompts you to do so. Once that has happened, open up a web browser and check whether you can open any web pages.
What to Do Before Resetting Network Settings
Performing a network reset is one way to resolve connection issues, but it’s still one of the major troubleshooting steps. Thus, check for some basic points first.
Restart Your Computer
To begin with, restart Windows.
This basic procedure can consolidate temporary network issues. In addition, it can also restart any other services that may not have been working exactly as they should.
Restart Your Router
Next step is rebooting your modem.
Switch it off and leave it for a few seconds. After that turn it on again and wait till the connection comes back.
If the other devices have the same networking issues, then the problem may lie within the modem.
Check Airplane Mode
See if the Airplane mode is disabled.
For a laptop, check whether there is a physical Wi-Fi switch or a keyboard shortcut to enable wireless communication.
Forget and Reconnect to Wi-Fi
When Wi-Fi connects to the network but there are repeated failures, the first action is to forget the network.
Navigate on Wi-Fi settings, select the network and press “Forget Network” button. Afterward, re-enter the password and again connect.
What to Do After a Network Reset
When the process is over, review your Internet connection.
Reconnect to your Internet and open different web pages using a browser.
If everything works, then there is nothing else to do.
However, you will need to restore a few customized settings, such as:
- Connecting to VPN services.
- Adding Wi-Fi passwords again.
- Configuring proxy settings again.
- Reinstalling some virtual network adapters.
- Restoring any DNS settings.
- Setting up special network software again.
There are very few home users who will change their settings.
If the Internet Still Does Not Work
Sometimes a network reset is not enough. If this is the case, then the source of the issue is more likely then not going to be somewhere else.
The first thing to check is whether or not other devices are able to connect to the Internet. If your cell phone and additional computer systems are unable to do so as well, then check your router and Internet service.
If the other devices are working just fine, then the problem is probably isolated to your Windows computer system.
The next step is to check your network adapter in the device manager. Look for any warning icons in the network adapter section.
You may use the Windows troubleshooter to find out if there are any problems with the network adapter, connection, or configuration.
You should also check the Windows update to see if it has an outdated or corrupted network driver.
If you have just installed a VPN, firewall, security application, or network utility recently, consider whether or not this is when the problem started.
Is Network Reset Safe?
For most users, Windows network reset is a safe option for troubleshooting because it simply restores your networking components and settings to default.
Nevertheless, using network reset does change your networking settings.
Thus, you should think carefully about your settings before using the network reset feature. If your computer is working with a normal static IP address, custom DNS server, or proxy server on a company network, you will likely need those settings later.
However, on a home computer, the inconvenience is just re-entering your Wi-Fi passcode.
Final Thoughts
Resetting the network settings on Windows is a way to fix persistent Wi-Fi, Ethernet, and network configuration issues on your computer. If you use Windows 11, go to Settings > Network & Internet > Advanced network settings > Network reset. If your computer uses Windows 10, open Settings and go to Network & Internet > Status > Network reset.
You may try to restart your computer and router before trying the network reset. Make sure to check your Wi-Fi connection and connect to it. However, if none of those remedies worked, then you may perform a network reset to get a fresh configuration of the Windows network.
You should connect to your Wi-Fi after the reset and verify the internet connection after the network reset. If there is still no internet, check the network adapter, drivers, router, and internet service. A step-by-step guide will allow you to locate the actual cause of the issue without unnecessarily changing your settings.